
Storing images is a massive concern for affiliates as this by far is the biggest space hog on your server.
The best approach to storing and serving images is to combine Amazon S3 and Cloudflare. Amazon S3 provides elastic storage and is VERY cheap for storing images – elastic means it grows and stretches according to your needs and cheap means you pay for what you use.
Amazon S3 isn’t the fastest at serving the images up to your users, but stick Cloudflare in front of your server and then only the first time the image is loaded will it be fetched from Amazon S3 – the next time it will come from any one of the hyper-fast Cloudflare servers.
Why not just use the plugin?
There is a plugin for Amazon S3 but it’s not great – it doesn’t let you transfer your existing images and worse, you still upload images to your server after which the plugin then copies them from your server over to Amazon S3.
That means you have an additional WRITE on your server and an additional READ on your server that are not required. Affiliates want performance so their products load quickly so we should just save images directly to Amazon S3 without involving your own server at all.
Setting up Amazon S3 for WordPress properly
To set up Amazon S3, use the following guide to replace /wp-content/uploads with your S3 bucket. That way, the entire uploads folder is always stored on Amazon S3 which means far fewer disk writes on my server. Disk writes are the *most expensive operation* it’s possible to do on a server, so eliminating them and offloading them to Amazon S3 which is specialised for this purpose works great.
sudo apt-get install build-essential gcc make automake autoconf libtool pkg-config intltool libglib2.0-dev libfuse-dev libxml2-dev libevent-dev libssl-dev

wget https://github.com/skoobe/riofs/archive/master.zip
unzip master.zip

cd riofs-master
./autogen.sh
./configure
make
sudo make install
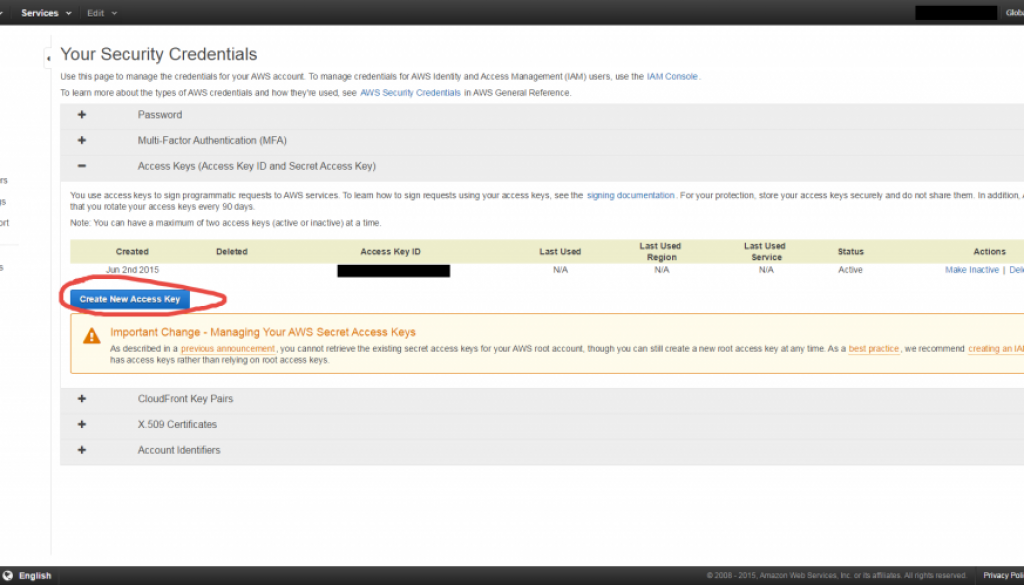
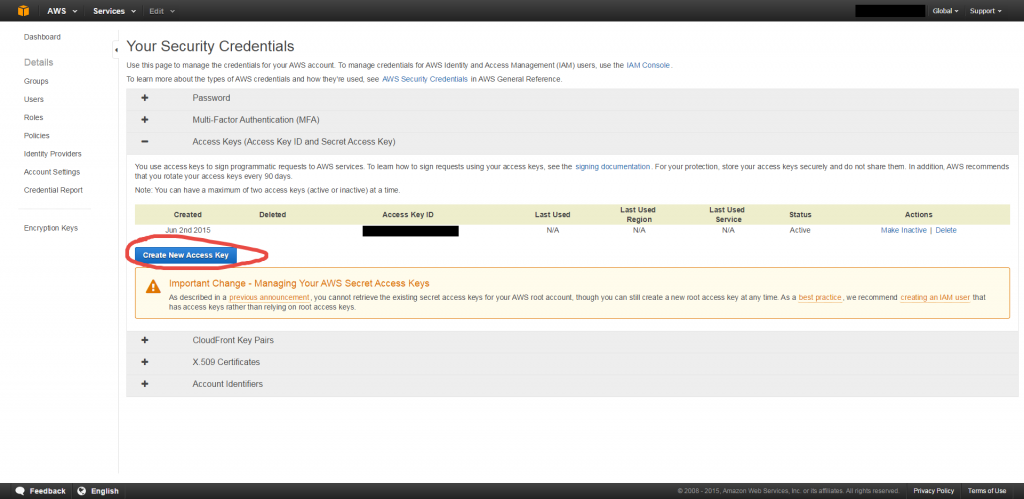
You need to have an ACCESS KEY and a SECURITY KEY for Amazon AWS. If you don’t yet have an Amazon AWS account, create one.
Once your account is created, click your name in the top right area then ‘Security Credentials’ in the drop down then create a new access key as per this screenshot:
Now edit the /usr/local/etc/riofs/riofs.conf.xml:
nano /usr/local/etc/riofs/riofs.conf.xml
Scroll down to the section that lists your access_key_id and secret_access_key. It will be commented out – remove the line before and after these two lines to uncomment the two lines then replace the ###AWS_ACCESS_KEY## and ###AWS_SECRET_ACCESS_KEY### with your own access key and secret key.
Now edit the /etc/fuse.conf file and uncomment the user_allow_other line (delete the # from in front of it)
nano /etc/fuse.conf
Next, click the AWS logo in the top right of the AWS page, then click S3 and ensure you have a ‘bucket’ set up. Remember the name of your bucket for the next section. If you wish to have images pulled directly from your bucket, please name your bucket something like images.yourdomain.com. This way, you can modify WordPress to pull images directly from there (or through a CDN) so that no load is on your server at all, even for routing these queries.
Now – to mount the folder, it’ll need to be empty to start with. So move your current uploads folder to ‘olduploads’ and then create a new folder called uploads:
mv /your/path/to/your/wp-content/uploads /your/path/to/your/wp-content/olduploads

mkdir /your/path/to/your/wp-content/uploads

chmod 755 /your/path/to/your/wp-content/uploads

chown www-data:www-data /your/path/to/your/wp-content/uploads
You also need to know the id’s of the user and group you wish this folder to connect as. For my servers, I tend to have www-data:www-data so I can find out the id’s for that user and group using the following command:
id www-data
Now to actually mount your bucket to that uploads folder:
riofs --uid=33 --gid=33 --fmode 0775 --dmode 0775 -o "allow_other" -c /usr/local/etc/riofs/riofs.conf.xml YOURBUCKETNAME /your/path/to/your/wp-content/uploads
It should connect with no message. Now, you can start copying everything from your olduploads folder to your new uploads folder:
rsycn -aP /your/path/to/your/wp-content/olduploads/ /your/path/to/your/wp-content/uploads
Now when you visit Amazon AWS and your S3 bucket page, you will see your uploads files listed there.
You also need to modify the permissions on your bucket. Visit your bucket on AWS, click Properties then click Permissions and ‘Edit Bucket Policy’.
Enter a bucket policy along the lines of the following:
{
"Version": "2008-10-17",
"Statement": [
{
"Sid": "AllowPublicRead",
"Effect": "Allow",
"Principal": {
"AWS": "*"
},
"Action": "s3:GetObject",
"Resource": "arn:aws:s3:::images.yourdomain.com/*"
}
]
}
That should be it – you now have your uploads folder hosted directly on Amazon S3. You can go ahead and run Datafeedr imports or WPAllImport jobs which involve importing massive numbers of images and they’ll all be placed directly onto Amazon S3 instead of your own server. If you run into any difficulties, e.g. images not displaying – check the file permissions as that’s probably what you omitted.
Setting up WordPress to access your images directly from the Amazon S3 images subdomain
The last thing to do is to set up your server so that images are retrieved directly from Amazon S3. Firstly, in your DNS settings (ideally with Cloudflare) point your images.yourdomain.com traffic at your Amazon bucket.
Then Modify your upload_url_path hidden option – access /wp-admin/options.php from your WordPress backend and find the upload_url_path field and enter //images.yourdomain.com
Finally, use the Interconnectit search and replace script to modify your existing posts – search for http://www.yourdomain.com/wp-content/uploads/ and replace that with http://images.yourdomain.com/
Troubleshooting
There is one major limitation of Amazon S3 – that is that appending to files is not possible. For many wordpress installations, this won’t cause any issues, but you may run into difficulties with some plugins. I’ll keep updating problems and solutions as I find them to the list below.
WP All Import Pro
WP All Import Pro uses the uploads folder. Specifically, it creates a folder uploads/wpallimport/* – various folders within here. As part of the import process, it creates text files which it then appends to. Since this is not possible on Amazon S3, you need to override the base directory with WP All Import Pro. There isn’t an option in the admin interface for WP All Import Pro to do this, however you can just open your wp-config.php file and add this line somewhere near the other define statements:
define('WP_ALL_IMPORT_UPLOADS_BASE_DIRECTORY', '../wpallimport');
That makes WP All Import Pro create its working directory at wp-content/wpallimport rather than wp-content/uploads/wpallimport which means it uses your normal file system rather than Amazon S3. Note: If you have debug enabled, it’ll spit out warning messages that you’re trying to define the same thing twice but with debug off it’ll run fine and use the setting you give in wp-config.php.
Founder at Affiliate Web Designers
Dave has been programming since 6 years old and has been developing WordPress plugins, themes and websites since 2010. In the past he built the browse view technology for Skyscanner and now he helps clients with interesting website challenges.
He is always on at least one of his computers when he's awake, so get in touch and he'll get right back to you.
He is always on at least one of his computers when he's awake, so get in touch and he'll get right back to you.
Latest posts by Dave Hilditch (see all)
- My WordPress performance plugins and server stack have moved - July 31, 2016
- Price Comparison Pro 1.2 Released - July 5, 2016
- How to run backups on huge WordPress websites without your website being brought offline - February 4, 2016
![secure-databackup[1]](https://www.affiliatewebdesigners.com/assets/secure-databackup1-394x330.jpg)
April 9, 2016 @ 6:06 pm
Great article. Small type on ‘rsycn’ instead of ‘rsync’ that people may run into. I was able to get through all of the instructions but I seem to be getting an error when trying to upload a new plugin and also when running WPAll Import.
The error is “The uploaded file could not be moved to wp-content/uploads/2016/04.”
I followed all of the instructions above. Is there anything you know of that may be causing this error and is there any reason I shouldn’t delete the olduploads folder?
Also I have all my files in S3 but it looks like my site is still using the uploads directory.
Best,
August 4, 2016 @ 8:25 am
Hi Dave, great article, thanks. I wonder if you could advise me on what to do regarding using wpallimportpro with resales online database. The whole image database is between 40-60gb , too much for my server so it keeps timing out. So they advised me to work out how to use cdn instead of importing images. How can I do this in wordpress using wpallimport pro?
here are some examples below of what redirect I need to do for every image.
http://media-1.resales-online.com/live/ShowImageXML.asp?SecId=dpilrbacrlrwjsm&Id=P18&ImgId=X1000610&z=1468681550&.jpg
http://media-cdn.resales-online.com/live/ShowImage/dpilrbacrlrwjsm.asp?Id=P18&ImgId=X1000610&z=1468681550&.jpg
August 4, 2016 @ 11:14 am
To use the CDN source instead of downloading your images:
December 2, 2016 @ 12:26 pm
I want to store my images on Amazon S3 – will it work with WP Smush Plugin?
February 19, 2017 @ 6:03 pm
I have not tested with Smush but it should work since Smush is just writing the images back to the uploads folder as normal.
July 10, 2017 @ 3:53 am
Hi, Dave
Can you record a video help me?
Thanks
September 14, 2017 @ 3:58 pm
Add me on Skype – davehilditch